Step Preparing Bokashi

USING THE BOKASHI BUCKET.


The Bokashi Bucket is a practical and convenient alternative for transforming kitchen waste into a nutrient rich soil conditioner. This unique composting system uses the revolutionary EM (Effective Micro-Organism) Bokashi to create the ideal conditions for airtight (anaerobic) composting, eliminating the odours and unpleasantness associated with putrefaction and decay.

WHAT YOU CAN COMPOST

You can compost almost every kitchen food waste including fresh fruit and vegetables, prepared foods, cooked and uncooked meats and fish, cheese, eggs, bread, coffee grinds, tea bags, wilted flowers and tissues.

Do not included liquids such as milk and fruit juice, paper and plastic wrap or meat bones.

STEP BY STEP


  1. Place a 3-4 cm layer of organic waste on top of the grate before coating evenly with a layer of EM Bokashi. Use approximately one handful of EM Bokashi to every layer of waste. Use more EM Bokashi when adding high protein foods such as meat, fish, cheese and eggs.
  2. Press down to remove air after every application. A plastic bag can be used for this.
  3. In order to reduce the oxygen and create the conditions for the anaerobic fermentation process to take place, ensure that the lid is closed tightly after each application.
  4. Repeat this layering process until the bucket is full, and top-up with a generous layer of EM Bokashi.
  5. Frequently drain the Bokashi Juice that has accumulated in the bottom of the bucket. You can dilute this Bokashi Juice (see instructions below) to make your own organic soil conditioner or tip it down the sink to help clean-up our waterways!
  6. Once the bucket is full to capacity, let the contents ferment for a period of 10-14 days at room temperature, continuing to drain off the Bokashi Juice regularly. While this full bucket of waste is fermenting, begin the process again in your second bucket. Wash the Bokashi Bucket after each use.
  7. Once the fermentation period is over, you will see that the food has been preserved and now has an appearance similar to pickles. The following indicates The Bokashi Bucket composting process has been a success:
  8. Smell: Well fermented Bokashi Compost should have a smell similar to that of pickles or cider vinegar.
  9. Visual: Occasionally, particularly for longer fermentation periods a white cotton-like fungi growth may appear on the surface. This shows that a good fermentation process has occurred.

Indications that the fermentation process has not been successful are:

  • Smell: A strong rancid or rotten smell
  • Visual: The presence of black or blue green fungi indicates that contamination has occurred and the process has putrefied.

If you have noticed any of these signs it is probably the result of:

  • Not adding enough EM Bokashi
  • Not replacing The Bokashi Bucket lid tightly after every use
  • Not draining the Bokashi Juice frequently from the bucket
  • Prolonged and direct exposure to sunlight or extreme temperatures

If your fermentation process has struck problems, find a spot in the garden, away from plants and dig a 30-35 cm hole. Place 3 handfuls of Bokashi into the bottom of the hole tip the poor batch of compost into the hole and mix with some soil. Sprinkle another 3 handfuls of Bokashi onto the poor compost and fill the hole in with soil.


USING YOUR BOKASHI COMPOST

After the fermentation period is complete, the compost is ready to be planted. Bokashi Compost will look different to other compost that has decayed. As the food waste does not breakdown or decompose while it is in the bucket, much of its original physical property will remain and it will have a pickled appearance. Complete breakdown of waste will occur a few weeks after it has been transferred to the soil.

Suggestions for the garden:

Burying Bokashi Compost in the garden will supply the plants with a nourishing food source and condition your soil with enriching microbes. The Bokashi Bucket composting system significantly accelerates the composting process of organic waste. Bokashi Compost is acidic when first dug in, but neutralizes after 7-10 days. Be sure plant roots do not come directly into contact with the compost as it may burn the roots, particularly if the plants are very young. Fresh compost can be stressful to new plants so it is best to wait two weeks before planning you favourite veggies, flowers etc.

To prepare your soil before planting, dig a hole or trench approximately 20-25 cm deep. Add your fermented Bokashi Compost and mix in some soil. Cover with remaining soil. For established gardens, dig the holes around shrubs or between rows of trees.

If you have don’t have space to dig a new hole every time you empty your bucket, you can create a “Bokashi compost heap” by burying a large bottomless plastic bucket with a good lid (30 litres and above is ideal) up to its neck. Mix a little soil to each batch of Bokashi Compost that you place into the bucket, and replace the lid.

You can use your Bokashi Compost in planter boxes, tubs or pots by placing it directly into the container for further fermentation. Fill 1/3 of the container with potting mix (new or used) then add the Bokashi Compost and mix with soil. Fill the remaining 1/3 of the container with potting mix and cover with a plastic bag to maintain anaerobic conditions. Wait two weeks before planting you favourite veggies or flowers, or transfer potting mix into smaller pots for planting.

Read More......

How Bokashi Works


The Bokashi Bucket

The key to the success of this system is the specifically designed Bokashi Bucket, and the use of EM Bokashi.

Bokashi is a Japanese term that means “fermented organic matter. EM Bokashi is a pleasant smelling product made using a combination of sawdust and bran that has been infused with Effective Micro-organisms (EM). EM Bokashi has traditionally been used to increase the microbial diversity and activity in soils and to supply nutrients to plants.

* Place your kitchen waste into the bucket, then sprinkle a hand full of EM Bokashi over the waste.
* Repeat this layering process until the Bokashi Bucket is full.
* Drain off liquid (Bokashi juice) as necessary.

Once the bucket is full to capacity, the waste can be buried. If you have two Bokashi Buckets, begin the process again in your second bucket. Let the waste from the first Bokashi Bucket continue to ferment for 10-14 days or for any additional length of time. Then, bury the waste and wash out Bokashi Bucket ready to use when your second Bokashi Bucket is full. If you have only one Bokashi Bucket the waste can be buried as soon as it is full, obviously the waste on the top has not had much or any chance to ferment, even so, the waste will still break down quickly because of the micro-organisms mixed in.

With two Bokashi Buckets the waste gets extra time to ferment, you will get more of the valuable Bokashi Juice and it is more convenient, however, this wonderful composting system will still work with just one Bokashi Bucket.

Bokashi Compost will look different to other compost that has decayed. As the food waste does not breakdown or decompose while it is in the bucket, much of its original physical property will remain and it will have a pickled appearance. Breakdown of waste will occur after it has been transferred to the soil.

This is what it should look like before you bury the waste.

Burying Bokashi Compost

Burying Bokashi Compost in the garden will supply the plants with a nourishing food source and condition your soil with enriching microbes.

* Dig a hole, add your fermented Bokashi Compost, mix with some soil and cover.
* If you are low on garden space you can create a Bokashi Compost Heap, by burying a large bottomless bucket with lid.
* You can use your Bokashi Compost in planter boxes, tubs or pots by placing it directly into the container for further fermentation.

Bokashi Juice

As the kitchen waste starts to ferment, Bokashi Juice will form in the bottom of the bucket. This should be drained off as it builds up.

* Bokashi Juice can be diluted with water and makes a terrific fertiliser for garden or pot plants.
* It can be poured down drains and it is safe to use in septic tanks.

When used in drains it will help to clean up our water ways by competing with harmful bacteria.

HOW TO USE BOKASHI JUICE


The amount and colour of the Bokashi Juice produced will depend on the type of foods you have put into The Bokashi Bucket. Fruit and vegetables tend to release more liquid than other foods. Do not be concerned if little or no Bokashi Juice is produced.

Bokashi Juice can be use for:
The Garden – Bokashi Juice contains nutrients from the food waste and is alive with Effective Micro-organisms (EM) and makes a terrific fertiliser. To fertilise an existing garden or pot plants use 1 teaspoon to 2-3 litres of water and apply directly to the soil. For trees and shrubs use 2 teaspoons to 2-3 litres of water. Do not apply directly to foliage.

Around the House – Pour the concentrated Bokashi Juice directly into your kitchen and bathroom drains, toilets or septic systems. The Effective Micro-organisms (EM) will help to prevent algae build-up and control odour. It will also help to clean up our waterways by competing with harmful bacteria.

Bokashi Juice cannot be stored and must be used within 24 hours after draining from the bucket.

Please! Please! make sure you don't unscrew the tap more than 3/4 of a turn. More than this, will loosen central mechanism of the tap itself and cause issues.

HELPFUL TIPS

You can never add too much EM Bokashi; better too much than too little to ensure complete fermentation and good smelling compost.

Only add fresh food waste to The Bokashi Bucket, never rotten or mouldy wastes.

* Break or chop large waste into smaller pieces.
* Remember - the less air that comes in contact with the compost the better so compact the waste by pressing it down to remove air. A plastic bag can be used for this.
* Always close the lid tightly and drain the Bokashi Juice that accumulates at the bottom frequently.
* Do not add water, excessive amounts of fluids or place the bucket in the sun.
* Wash the bucket after each use.
* The Bokashi Bucket has been designed to be used with EM Bokashi. Used with other products may result in putrefaction rather than fermentation of food wastes.
* This is a new approach to composting. Don’t be afraid to experiment with it until you get a feel for how this process can work for you.
* Look into community composting & gardening projects in your area.

Read More......

Bokashi Composting

Bokashi is a method of intensive composting. It can use an aerobic or anaerobic inoculation to produce the compost. Once a starter culture is made, it can be re-used, like yogurt culture. Since the popular introduction of effective microorganisms (EM), Bokashi is commonly made with only molasses, water, EM, and wheat bran.

However, Bokashi can be made by inoculating any organic matter with a variety of hosts of beneficial bacteria/microbes. This includes manures, spent mushroom compost, mushroom spores, worm-casting tea, forest soil tea, yeast, pickles, sake, miso, natto, wine and beer. Molasses feeds the microbial cultures as they inoculate the organic matter.

Process

In home composting applications, kitchen waste is placed into a container which can be sealed with an air tight lid. These scraps are then inoculated with a Bokashi EM mix. This usually takes the form of a carrier, such as rice hulls, wheat bran or saw dust, that has been inoculated with composting micro-organisms. The EM are natural lactic acid bacteria, yeast, and phototrophic bacteria that act as a microbe community within the kitchen scraps, fermenting and accelerating breakdown of the organic matter. The user continues to place alternating layers of food scraps and Bokashi EM until the container is full.

Once the bucket is full to capacity, the waste can be buried. Two Bokashi buckets are often employed, in order to create an alternating setup. Waste from the first Bokashi bucket is allowed to continue to ferment for 10–14 days or for any additional length of time. The waste can then be buried. The empty Bokashi bucket is then ready to use when the second one is full.

Uses

Liquid, known as Bokashi Juice [1] is drained off as necessary. This liquid can be used as plant food, or can be poured down the drain. This may be a good practice for households with septic systems, as it is believed that this may help maintain a healthy septic environment within the holding tank. Bokashi juice is acidic, however, and if being used as a plant feed, it should be diluted at a rate of 1:100 parts water.

Bokashi Compost will look different to other compost that has decayed. As the food waste does not breakdown or decompose while it is in the bucket, much of its original physical property will remain and it will have a pickled appearance. Breakdown of waste will occur after it has been transferred to the soil.

Burying Bokashi compost in a garden supplies plants with a nourishing food source and condition the soil with enriching microbes[citation needed]. If the fermented Bokashi compost is being transferred directly to the garden, the material should be buried in a thin layer, at least a foot underground (to keep animals from digging for it) for 4–6 weeks prior to planting.

Bokashi compost scraps can also be mixed into a regular/traditional compost pile instead of transferring to soil. The bokashi mix is an excellent way to heat up the compost pile.

Take care not to plant fresh Bokashi waste too close to sensitive plants or bedding plants such as lettuce. If unsure, test in a separate patch of the garden and/or reduce the dilution ration to 200:1.

Read More......

Eid al-Adha


Today is 12 Zulhijjah islamic calendar. Eid al-Adha is a "Festival of Sacrifice" or "Greater Eid" is a holiday celebrated by Muslims worldwide to commemorate the willingness of Ibrahim to sacrifice his son as an act of obedience to God. Eid al-Adha annually falls on the 10th day of the month of Zulhijjah (ذو الحجة) of the lunar Islamic Calendar. The festivities last for three days or more depending on the country. Eid al-Adha occurs the day after the pilgrims conducting Hajj, the annual pilgrimage to Mecca in Saudi Arabia by Muslims worldwide, descend from Mount Arafat. It happens to be approximately 70 days after the end of the month of Ramadhan.

Muslims who can afford to do so sacrifice their best domestic animals (usually sheep, but also camels, cows and goats) as a symbol of Ibrahim's sacrifice. I choose to celebrate Eid al-adha at Yong Peng (F&M in law's house) since my wife still in "Pantang" 44 days after gave birth Qiesya Qairiena. We took 1 portion of cow meat for Qiesya Aqiqah.

Read More......

Cucumber plant update


Read More......

Cucumber Mosaic Virus (CMV)


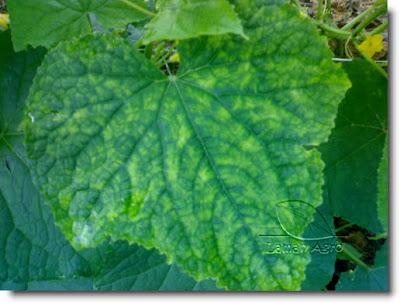
A few of cucumber plants has infected with cucumber mosaic virus with heavy daily rain distribution to this area.
The cucumber mosaic virus has one of the broadest host ranges. Cucumbers infected with the cucumber mosaic virus develop a slight yellowing and mottling of the older leaves. Expanding leaves typically become twisted, curl downward, and develop a "shoestring" appearance as a result of a restriction of the leaf surface to a narrow band around the midrib of the leaf. Diseased plants are stunted and produce small quantities of fruit.

The disease affects a number of important vegetables and ornamentals including tomato, pepper, cucumber, melons, squash, spinach, celery, beets, and petunia. A virus distributed world wide, affecting most cucurbits. New growth is cupped downward, and leaves are severely mottled with alternating light green and dark green patches. Plants are stunted, and fruits are covered with bumpy protrusions. Severely affected cucumber fruit may be almost entirely white.

MEANS OF CONTROL

* The virus is readily transferred by aphids and survives on a wide variety of plants. Varietal resistance is the primary management tool, and eliminating weeds and infected perennial ornamentals that may harbor the virus is critical.

* Virus diseases cannot be controlled once the plant is infected. Therefore, every effort should be made to prevent introduction of virus diseases into the garden. Sanitation is the primary means of controlling virus diseases. Infected plants should be removed immediately to prevent spread of the pathogens. Perennial weeds, which may serve as alternate hosts, should be controlled in and adjacent to the garden. Avoid planting tomatoes next to cucurbits, spinach, or other vegetables and flowers susceptible to these diseases. Control of aphids will help reduce the likelihood of cucumber mosaic.


Read More......

Botanic Pesticide

Botanic pesticide is from organic ingredients, one of alternative for farmer use to control the pest in their garden and farm. For home gardener this alternative is more suitable and simple thing to do and very economic cost comparared with chemical pesticide. Other than that, the chemical pesticide will take effect to user if they wrongly apply to their plant or miss placed. So, botanic pesticide is one of safely solution to avoid human injury if there is miss using and miss place the chemical pesticide.

Pest catagory : (chew)
Beetles, grasshopper, butterfly, shell, others

Pest catagory : (suck) virus vector & deceases
Aphid, Scaler, White fly, mites and others

Preparation of Stock Solution
1. 1 Liter of water
2. 1 spoon cooking oil / vege oil
3. 1 spoon detergent
4. 4-6 pieces of garlic

Pour in cooking oil into 1 Liter of water. Grind the garlic and add in into water+garlic solution and stir. Filter all the ingredients solution. Final preparation to use, 1 : 4, stock solution : water.

* for chewer pest, add in a few of chilly powder
* for sucker pest, add in a few of essential oil or ginger (blended).

Thats are the procedure that can be used for small lanscape or home gardener. For bigger scale plantation, we can sugest to use :

Onion extract
To control antranoks and other chilly deceases. Blend 50gm onion in 1 liter water, filter and spray to the infected chilly.

Tea Tree Mixture
To control damping-off - mix 5 ml tea tree oil into 10-20 Liter water. Apply this solution by moisture up the soil (Soil Drenching)

Ginger Extract
To control fungicide - Blend 20g of ginger in 1 Liter water, filter and spray 3 times a week.

Neem leaf extract
To control white fly, aphids, thrips - Mix 2 kg of blended neem leaf with 30 g detergent. Lets the mixture for 1 night and filter. For each 5 liter portion to be mixed with 15 liter water and spray to your plant.

Garlic extract
Also to control vector as above, white fly, thrips, mites - Mix 100 g chopped garlic into 0.5 liter water. Add 10 ml cooking oil and 10 g detergent. Leave it for 1 night and filter it. For spray, mix that mixture with water in portion 1:200

Read More......

Cucumber Diseases and Pests

You can grow your cucumber starter plants indoors up to 2 weeks before you’re ready to plant. You can also plant seeds directly in the garden. Arrange your garden in small hills and plant around 4 seeds per hill. Separate your seeds by about 2-3 feet. You can also ground your cucumbers in rows. Space your rows about 4 feet apart, with the seeds about 2 ½ feet apart in the rows. Remember that some cucumbers varieties are suitable for container gardens.
Cucumbers unfortunately suffer from a variety of pests and diseases. Aphids, pickle worms, mites, and cucumber beetles are common pests you may see in your garden. Diseases you’ll need to look out for are anthracnose, powdery mildew, downy mildew, bacterial wilt, and angular leaf spot.
The cucumber beetle is a particularly nasty pest that attacks plants early and also spreads bacterial wilt. Look for this pest as seedlings emerge. Also look for signs of bacterial wilt early on. Plants infected with bacterial wilt will droop and eventually die.

We recommend using a natural pest control method to treat problems with your cucumbers. If you use chemical pesticides, you may be harming the bees that will fertilize your vines. Chemical pesticides can also harm other beneficial insects and soil organisms.

Read More......

Today diary...

Today 18.11.2009 I went to garden and start work in early morning. The weather is quite good with a little sun shine, not so hot until afternoon time. In the morning, I've been transplanted about 350 of cucumber plants into the ridge and after lunch, I pick up two bundles of ready stacking bamboo to the farm. After that I finish up all the bamboo support for cucumber ridges which are not complete yet. Since everydays we receive heavy rain, many cucumbers plant are collapse onto the ground so that I tie up all the cucumbers plant with rafia ropes. 6.30 pm go back home.


Read More......

Know Your Pesticide

When we talk about pesticide, many gardener do not know how to control the pest in their garden. In this scenario, they are sometimes wrongly apply the pesticide to control certain pest in their garden.

Below are two of pesticide which is to control the fungicide and the mites. Antracol is a fast-acting organic fungicide, has been produced and marketed in Indonesia for more than 30 years. It is especially suitable for protective control of Phytophthora and Alternaria on vegetables. It features good residual activity. Good results have been obtained with Antracol also against leaf spot diseases on vegetables. Antracol is well tolerated at the specified concentrations by the crops for which it is recommended. No risk of resistance formation (multi-site)/useful in anti-resistance programs for different pathogens (downy mildew, Alternaria, scab etc. ). Important source zinc supply in case of deficiency for many crops, such as potato, tomato, grapes. Excellent phyto-compatibility for various crops, also in early development stages Product Benefit - Works effectively at any season (dry and wet season) - Suitable to be applied in low and high land crops - Reliable, has been a market leader for more than 30 years. - Supply trace elements (zinc) - Excellent phytocompatibility for various crops, also in early development stage.


Whereby to control mites on vegetables and other crops plant is Mitec by Bayer. This type of pesticide is suitable to control mites from 'Amidine' group which is effect on direct contact and also through breathe to nerve systems.


Read More......

Preparing cucumber netting support


Above are the pictures how we prepare the netting support for cucumber plant. The materials are, bamboo stick, rafia rope and metal strand.


Read More......

On Hold Chilly

We have to re arrange the schedule for our farm since nowaday is raining day. So, to avoid inconsistent crop plant grow especially for chilly plant, we decided to keep chilly project in this new farm ON HOLD until the weather is good. To keep our farm keep producing crops, we switching to cucumber plant until early next year (Jan-Feb 2010) then we will grow the Local Kulai Chilly and others few crops plant.

About 2300 cucumbers successful transplanted into the soil and coming 4000 will be ready in a few days to be transplanted.

Below is the 3 days cucumbers seed in the media trays (1 1/2 inch height)


Read More......

Preparing Cucumber Support


On 11.11.2009, we went to our friend farm to get the bamboo for cucumber support preparation since the cucumber plant is about 1 and half week. The cucumber is very fast growth compare with other crops plant. In the first two weeks, we need to get all the support ready at the farm. Cucumbers also require a decent amount of growing space in the garden so that's why we need make the support for them. Cucumbers are not picky about soils.

However, we have to make sure the soil is well-draining and has a pH of around 6.5. Add plenty of organic compost to your garden soil before you grow cucumbers. This will ensure that they have the proper nutrients to grow strong and healthy.

Read More......

Transplant Cucumbers


On 4th November 700 cucumbers baby had transplanted in evening time after rotoring the soils and today only 700 cucumbers successful transplanted to the ridges due to continues raining from morning til evening time.


Read More......

Plowing, Rotoring and Ridging


Picture after plow

After the clearing the land, we need to plow for the whole area at lease 1 time. But normally for vegetable, we need to plow two time following by rotoring and finish by ridging job. I advice to use 4 wheels drive tractor instead of two because this type of machine is more powerful and fast doing their job. We hire Eurostar tractor 4 wheels drive combination of rotor and ridge (2 in 1) for easy and fast job.


Rotoring & ridging in progress...


Photos of ridge width 3 inches for cucumbers and 4 inches for chillies


Read More......

Land Preparation

Land preparation typically involves leveling, plowing, rotoring, and ridging the field to make it suitable for crop establishment. 2-wheel tractors or 4-wheel tractors can all be used as power sources in land preparation. The initial soil tillage can also be performed with a rotovator instead of a plow.

Flooded Soils

The vast majority of Asian rice fields are first flooded with water before tillage. This tillage of flooded soil is referred to as puddling. Soil flooding and soaking is performed once and requires sufficient water to bring the topsoil to saturation and create an overlying water layer. Soil puddling destroys soil structure, which reduces percolation rates and loss of water. It also results in high resistance to root penetration, low porosity, and permeability and in the formation of a soil plow pan; all of which can restrict root growth.

Puddling is very efficient in clay soils that form deep cracks penetrating the plow pan at about 15 to 20 cm soil depth during the period of soil drying before land preparation. Although puddling reduces percolation rates of the soil, the action of puddling itself consumes water. There is a trade-off between the amount of water used for puddling and the amount of water “saved” during the crop growth period as a result of reduced percolation rates. Puddling is less effective in coarse soils, which do not have enough fine clay particles to migrate downward and fill up the cracks and pores in the plow pan.

Non Flooded Soil:

A well-leveled field is a prerequisite for good water and crop management. When field are not level, water may stagnate in the depressions whereas higher parts may fall dry. This results in uneven crop emergence and uneven early growth, uneven fertilizer distribution, and possibly additional weeds. Effective land leveling will :

* Improve crop establishment and care,
* Reduce the time and water required to irrigate the field, and
* Ensure more uniform distribution of water in the field

Land preparation for dry seeding typically involves consists of plowing or rotovating followed by harrowing and leveling of dry and friable soil. The crop is established by broadcasting or drilling seed that has not been pre germinated.


Farmers can reduce water use by shifting from puddled to non-puddled land preparation. Large amounts of water (20–40% of total water use) are consumed during land preparation of flooded soils because of the need to initially soak dry and cracked soil, and to keep the field continuously flooded. Most of the wasted water is lost by drainage through soil cracks. Dry land preparation does not require irrigation water because it can be done when the soil has the correct water contact and is friable for plowing or rotovating and harrowing.

Read More......

Day 8 Cucumbers

Snap shot day-8 cucumber in the media tray waiting for transplant into soil.

Read More......

Cucumbers Variety


We bought two types of cucumber from different variety at this time which is from Hybrid F1 Harmony from Cropcare Biotech (UK) Ltd and local cucumber seeds ,CH cucumber from Chian Hup. I had receive 1 packet of cucumber seed which called Hercules variety from one of malaysian's agro colleague from Indonesia cost about RM 16.00 per pack (900-950 seeds). We still need to know which variety is most demanding from agriculture wholesalers. About 2,300 seeds from CH and Harmony variety have been soil into tray media and will be transplant in 5-6 days after seedling.


Read More......

My wife gave birth!


Sorry for not updating the blog. I was busy with my family in last few days. My wife gave birth baby girl 3.35 kgs on 31.10.2009 at 10.26 am. She were discharged from Hospital Batu Pahat on 01.11.2009 at 12.30 pm. So, i want to share my new baby picture with my friends who always read my blog. Her name is Qiesya Qairiena.


Read More......

More pictures !


Read More......

Sungai Telor Project


Side view from the border of land, about 1.8 acres to be plant with chilly and cucumbers. This picture taken after finish clearing the land and waiting for plough job. Due to inconsistent weather in a few weeks, we have to wait until the top surface of soil completely dry. Hopefully in this week we can start the plough job and start seedling the chilly.


Read More......

Clearing in progress...


Read More......

Sungai Telor Back Flash


This view of Sungai Telor's project before the whole area been cleared. This picture is after 30% of small trees and undergrowth has been cleared by back pusher.


Read More......

New Project Map

Sungai Telor Chilly Plantation Phase 1


View Sungai Telor Project Phase 1 in a larger map


Read More......

I'm Back!

Assalamualaikum and Salam sejahreta to all readers,

I would like to apology for being idling from blogging for 3 months due to very busy in personal and business. I'll try to update the blog on daily basis depend on the what updates changed.

Today October 05, 2009 I'm back to my blog to write the journey from home garden to commercial plantation. For last few weeks and months, I was busy preparing something to get into commercial plantation.

My plan is move foward where we found the area for our project. We plan to plant 1.8 acres of chilly at Kampung Baru, Sungai Telor, Kota Tinggi area. The progress work now is about 10% which is clearing the land and setup the farm infrastructures. I will update when I have update from time to time...

Read More......

Long Bean : Day 45


Update picture for long bean. Today is days 45 the long bean after transplanted.


Read More......

Little Chilly : 100 Days


Today June 28, 2009 is 100 days of little chilly groom and I did harvest the chilly fruits a few time. At least I can save a few dollar instead of buy at the market.


Read More......

Long Bean : Day 25


Today is 17 days long bean after transplanted into polibags. I use 'rafia' rope to make the semi-trellis system for support due to hard to find the bamboo stick around this area. So I have to use alternative support to replace a normal support and trellis system is the best for my small garden.


Read More......

Drip Irrigation New Installed

On the 2nd June 2009, I bought the PVC pipes and fittings to install the Irrigation system for my garden. Cost for this system about Ringgit Malaysia Fifty all together. The timer I bought not function for 2-5 minutes run time. It was 15 minutes minimum and its not work for irrigation system with small water storage tank. I need to change a digital timer to make this system perfect and some modification at the storage tank. Below is the illustration how the pipes goes to the individuals polibags for chillies, long beans, and tomatoes plant.


Read More......

Updated Garden Pictures

Little chillies 65 Days old after transplanted


2 days old Long Bean from black seeds after transplanted

Read More......

Tips for Watering Tomato Plants

Water slowly, water deeply – The number 1 rule of watering tomatoes is to make sure that you go slow and easy. Never rush watering tomato plants. Use a drip hose or other forms of drip irrigation to deliver water to your tomato plants slowly.

Water regularly - How often should you water tomato plants? There is no hard and fast rule to this. It depends on how hot it is and if the plant is actively growing. A good rule of thumb is to supply water once every 2 – 3 days at the height of summer. Remember that water supplied by Mother Nature counts towards watering tomato plants in the garden. Once the weather cools and fruit has set, scale back watering to once a week.

Water at the roots – When watering tomatoes, make sure you get the water straight to the roots. Do not water from above as this can cause disease and pests to attack the plants. Watering tomato plants from above also encourages premature evaporation and unnecessarily wastes water.

Mulch – Using mulch help to keep water where the plants need it. Use mulch to slow down evaporation.
Problems related to improper watering tomatoes

Improper watering can lead to the following issues:


Blossom end rot
Stunted growth
Reduced fruit production
Susceptibility to pests
Root loss
Sub-quality fruit

Now that you know how often should you water tomato plants and how much water tomato plants need, you can water tomatoes in your garden with confidence and enjoy the fruits of your labor.

Read More......